Bill of Materials
- 4" x 8-1/2" 1/2 in thick plywood
- 1-3/4 in. entrance hole
- steel plate 3 x 1-1/4 x 1/8 in think
- brass rod 3/32 in diameter for trigger
- insulated electrical staples for hinges
- pivot screw #6 x 1/2 in round head wood screw
- stop screw #6 x 1/2 in round head wood screw
- U-shaped clip
Assembly Instructions
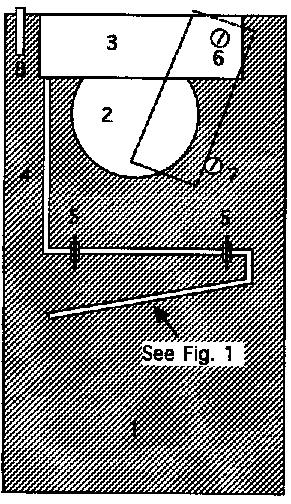
- Cut a piece of plywood (1) approximately 4" x 8-1/2" or to a size which fits inside your boxes
- Before drilling the entrance hole (2) it is a good idea to measure the dimensions to the center of the hole in your nest boxes to assure
that the two holes will align properly.
- Cut steel plate (3) to size if required; drill a 1/8" hole in the plate for the pivot screw as shown.
- Install the steel plate above the entrance hole using the pivot screw (6) so that the top is
flush with the top of the plywood. Do not tighten the screw too tight. Plate must be free to swing.
- Install the stop screw (7) so the plate, in the tripped position blocks off most of the entrance hole.
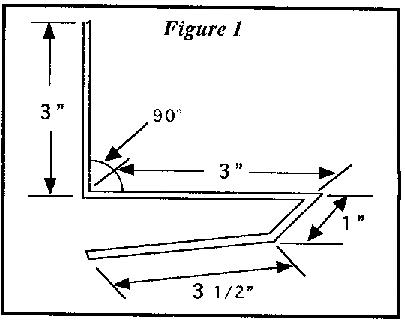
- Bend a 10-1/2 brass rod (4) to the shape shown in Figure 1. Be sure to bend the lower part of
the rod outward as shown. This will be the trigger.
- Mount the trigger on the plywood with the two insulated electric staples (5) that will serve
as the hinges for the trigger as shown so that the top of the trigger supports the steel plate in the open position.
- Bend a brass rod or coat hanger wire into a U-shaped clip (8). This is used to wedge the trap against
the inside of the nextbox.
Usage
- Only use the trap will you be around to check on it regularily throughout the day
- Watch/listen for a male sparrow in & around your box.
- Place the trap inside the box and clip it into place.
- Check the trap every 20 minutes or so to see if it is tripped.
- When tripped, carefully open the nestbox with a plastic bag or mesh net to catch the
bird when it flees.
- If you catch a native species (bluebird, tree swallow, wren, chickadee) release it. It is against
the law to hurt native species.
- Remove the trap when done or if you cannot stay to continue monitoring it.